
Build any AI workspace you can imagine—data analytics, slide decks, writing tools, personal notes, even prompt playgrounds—right inside Cursor with a one-click makeover.
Cursor, Windsurf, or VS Code doesn’t have to stay a code editor; each can become a multi-purpose AI-agent hub with custom interfaces tuned to your workflow.
Powered by our open-source toolkit, you can vibe code your own agent in minutes—or install an off-the-shelf extension and start vibe creating, zero code required.
You will be guided through the setup of ViewerKit in this documentation.
Star our toolkit on Github
↗
Before we get started
Glad that you’ve made it here, I’m Dabo and I will walk you through the setup of either the extension or the open source toolkit.
Viewerkit Toolkit is inspired by how people hack Cursor to do things beyond coding. I was never a fan of the IDE interface until I realised that I can customise it to fully embrace the AI agent workflow on almost anything.
What you will get:
1.A few ready to use extensions that work out of the box to get you started.
2.An open source toolkit that you can use to build your own AI agent tool on top of Cursor.
When I talk about Cursor in this document, I’m basically referring to all VS code based IDEs.
Installing ViewerKit extensions
Follow these steps to install and use the above extensions.
This is all you need to know if you are only interested in the extensions. Continue reading if you want to know how to build your own extension.
Getting started with ViewerKit Toolkit
I’ve made a few extensions for my own use cases and found myself building the same foundation of these extensions.
The file handling with auto save and hot reload with conflict resolving, compatibility with different versions of VS Code and the basic framework for the web view of any content etc.
Then I rebuild the core of these extensions into this Viewerkit Toolkit project. I have optimised it for Vibe coding, so after you git clone it, you can easily ask Cursor to read the codebase and the documentations to start building your own extensions on top of it.
The template inside the project is basically a bare minimum version of an extension that can run and load any specified file and render it in a web view panel. It already handles the file I/O tasks, and all you need to do is to prompt Cursor to build on top of it with your own requirements.
git clone https://github.com/dabochen/viewerkit.git
So, just git clone the project, and you are 90% there.
Running the template
The template is a fully working extension that loads markdown files raw content and renders it in a text editor, so that you can try the auto save when editing, and it will update the content when external changes are made to the file.
I suggest you to run it once before getting into the development of your own extension if it is the first time that you build a VS Code extension.
# Go to the folder and install dependencies as they don’t come with the source code
cd packages/templates/simple-react-extension
npm install
# Build webview React APP
cd webview-ui && npm run build
cd webview-ui && npm run build
# Go back up one level and compile the extension
cd .. && npm run compile
With the above steps, your extension is ready in the development environment and can be tried out inside the IDE. To test it, follow the next steps:
Launch the extension in the VS Code’s debug host window
Click the ‘Play’ button at the top left corner of your IDE. It usually is the 4th button. This opens the debug panel, and at the top, you should see “Launch ViewerKit Template Extension”, if not, click the drop down and select this option.
Then click the green play button, and a new window will be launched, open a new folder as a project, and create any markdown files to test with.
Open files with extension’s custom view
In the new window, right click on any markdown file from the left panel, then you will see a list of options starting with “Open with ...”, if the file is open after you click on the highlighted option, it means it is running properly.
Building your first extension with ViewerKit Toolkit
Let’s talk about limitations before we get into the details.
ViewerKit’s core idea is to add an interface layer to any type of files inside Cursor, so that when you vibe edit them through the agent, you get a much better and more friendly interface to interact with the files, to view and edit manually.
The three extensions that are launched with the toolkit are all built with this idea.
The whole idea is to leverage Cursor to be the universal purposed agent which handles the online search, the local file retrieval and the file editing. All we are bringing to the table is the UI layer that turns your targeted file format into a desired interface beyond a text editor.
This means that the extension is NOT going to change how the Cursor agent works or its chat window, it is only there to replace the default code editor panel with a customised view along with any custom logics running in the background.
Best practices
Based on the understanding of the limitations, you can design your app in this simple format:
A file format + How I want it to be shown + How I want it to be interacted with
You could design a viewer for a specific json format that is being used in your workflow, so that you can view and edit it in a customised view, and use Cursor to edit it with the agent.
You could also design an editable viewer for config files, so that both Cursor and you(your team) can manage it.
Beyond the simple one file + one viewer format, you could also design more complexity into it, and load multiple files into one view, just like the I18n Manager extension on our website, which takes in multiple translation jsons and renders them in one table (If you do this, make sure you tell Cursor to be aware of this difference from the default template).
If you want something that can be integrated to your software project, you could design a unit test dashboard that manages all the tests and let Cursor agent create them and run it while you see the results gets updated in the dashboard.
There is a million things you could build with ViewerKit to enhance your workflow, whether you are a developer or a designer, a product manager or anyone who wants to leverage an AI agent for your own workflow.
Start with these questions:1.What workflow do I want to use Cursor agent for? (The ones beyond coding)2.What files are being used in this workflow? (The ones that can be edited by LLMs directly or edited by code)3.How do I want to view these files and how do I want to edit/interact with them? (the viewer, the editor or the attached functions on handling these files)
Vibe code the extension
Start with the built in template [packages/templates/simple-react-extension], and write up your prompt to guide Cursor to build your extension based on the template.
You should consider using our template prompt below, as it has been written to cover most necessary details on building the extension, and all you need to do is to update the placeholders with your own requirements.
The prompt template document
https://github.com/dabochen/viewerkit/blob/main/packages/templates/extension-prd-template.md
Your actual prompt can be very simple, and you can @ this file in the agent chat window, and ask the agent to follow instructions from this file to implement it.
The prompt template and the extension template are being design to let you create the fully working template in ONE prompt, unless it is a very complicated requirement, it should work just fine, if you do have a more complicated idea, try to limit the first version to a MVP, so that you can at least get something running to make sure that you are on the right track before adding more to it.
Testing and deployment
For testing, after the extension code is compiled and built, make sure you prompt the agent to add your new extension to the launch.json file in the /.vscode folder (which should contain the template’s entry point), you either replace it or add your new extension to it.
This will add a new extension to this list below, and you can select yours before click on the play button. Then the rest of the testing will be the same as the template extension we talked about earlier.
To deploy it, you can package the project into a .vsix file and install it in any VS Code IDE, just ask Cursor to help you package it for you. Then go to your target VS Code IDE and follow these steps:
# Open the command panel in Cursor or VS Code
cmd + shift + P
# Type this command in the input box, press enter and select the .vsix file from your folder
Extension: Install from VSIX...
Then you are all set, you should see it work as you designed, and it should be listed in the extensions panel like the screenshot below.
More thoughts
As I build the ViewerKit Toolkit and the extensions (expect more extensions!), I started to feel that there could be a real shift in software production and distribution.
People criticise on how vibe coded software by non-developers are just demos, and I agree with that as production level software is a complicated system even for a small project and the code is only part of it. However, I do want to challenge this idea, maybe the traditional way of building software is just out dated.
Personal computing is not really personal, the device is personal, but the software is an abstraction from similar needs. How do you make software personal beyond an abstraction?
Based on ViewerKit, the answer would be “A toolkit” + “A prompt”.
The toolkit is the house you live in, and the prompt is the furniture.
We don’t ship and distribute fully made softwares, we ship ones that have a solid foundation and can be prompted to add the customised layer.
Join me on my X (x.com/chendabo), and @ me with your new invention!
Build any AI workspace you can imagine—data analytics, slide decks, writing tools, personal notes, even prompt playgrounds—right inside Cursor with a one-click makeover.
Cursor, Windsurf, or VS Code doesn’t have to stay a code editor; each can become a multi-purpose AI-agent hub with custom interfaces tuned to your workflow.
Powered by our open-source toolkit, you can vibe code your own agent in minutes—or install an off-the-shelf extension and start vibe creating, zero code required.
You will be guided through the setup of ViewerKit in this documentation.
Star our toolkit on Github
↗
Before we get started
Glad that you’ve made it here, I’m Dabo and I will walk you through the setup of either the extension or the open source toolkit.
Viewerkit Toolkit is inspired by how people hack Cursor to do things beyond coding. I was never a fan of the IDE interface until I realised that I can customise it to fully embrace the AI agent workflow on almost anything.
What you will get:
1.A few ready to use extensions that work out of the box to get you started.
2.An open source toolkit that you can use to build your own AI agent tool on top of Cursor.
When I talk about Cursor in this document, I’m basically referring to all VS code based IDEs.
Installing ViewerKit extensions
To install any of them, click on the download link, then open and project in Cursor, and use “cmd + shift + P”, this will launch a command window, and type “”
To install any of them, click on the download link, then open and project in Cursor, and use “cmd + shift + P”, this will launch a command window, and type “”
Getting started with ViewerKit Toolkit
I’ve made a few extensions for my own use cases and found myself building the same foundation of these extensions.
The file handling with auto save and hot reload with conflict resolving, compatibility with different versions of VS Code and the basic framework for the web view of any content etc.
Then I rebuild the core of these extensions into this Viewerkit Toolkit project. I have optimised it for Vibe coding, so after you git clone it, you can easily ask Cursor to read the codebase and the documentations to start building your own extensions on top of it.
The template inside the project is basically a bare minimum version of an extension that can run and load any specified file and render it in a web view panel. It already handles the file I/O tasks, and all you need to do is to prompt Cursor to build on top of it with your own requirements.
git clone https://github.com/dabochen/viewerkit.git
So, just git clone the project, and you are 90% there.
Running the template
The template is a fully working extension that loads markdown files raw content and renders it in a text editor, so that you can try the auto save when editing, and it will update the content when external changes are made to the file.
I suggest you to run it once before getting into the development of your own extension if it is the first time that you build a VS Code extension.
# Go to the folder and install dependencies as they don’t come with the source code
cd packages/templates/simple-react-extension
npm install
# Build webview React APP
cd webview-ui && npm run build
cd webview-ui && npm run build
# Go back up one level and compile the extension
cd .. && npm run compile
With the above steps, your extension is ready in the development environment and can be tried out inside the IDE. To test it, follow the next steps:
Launch the extension in the VS Code’s debug host window
Click the ‘Play’ button at the top left corner of your IDE. It usually is the 4th button. This opens the debug panel, and at the top, you should see “Launch ViewerKit Template Extension”, if not, click the drop down and select this option.
Then click the green play button, and a new window will be launched, open a new folder as a project, and create any markdown files to test with.
Open files with extension’s custom view
In the new window, right click on any markdown file from the left panel, then you will see a list of options starting with “Open with ...”, if the file is open after you click on the highlighted option, it means it is running properly.
Building your first extension with ViewerKit Toolkit
Let’s talk about limitations before we get into the details.
ViewerKit’s core idea is to add an interface layer to any type of files inside Cursor, so that when you vibe edit them through the agent, you get a much better and more friendly interface to interact with the files, to view and edit manually.
The three extensions that are launched with the toolkit are all built with this idea.
The whole idea is to leverage Cursor to be the universal purposed agent which handles the online search, the local file retrieval and the file editing. All we are bringing to the table is the UI layer that turns your targeted file format into a desired interface beyond a text editor.
This means that the extension is NOT going to change how the Cursor agent works or its chat window, it is only there to replace the default code editor panel with a customised view along with any custom logics running in the background.
Best practices
Based on the understanding of the limitations, you can design your app in this simple format:
A file format + How I want it to be shown + How I want it to be interacted with
You could design a viewer for a specific json format that is being used in your workflow, so that you can view and edit it in a customised view, and use Cursor to edit it with the agent.
You could also design an editable viewer for config files, so that both Cursor and you(your team) can manage it.
Beyond the simple one file + one viewer format, you could also design more complexity into it, and load multiple files into one view, just like the I18n Manager extension on our website, which takes in multiple translation jsons and renders them in one table (If you do this, make sure you tell Cursor to be aware of this difference from the default template).
If you want something that can be integrated to your software project, you could design a unit test dashboard that manages all the tests and let Cursor agent create them and run it while you see the results gets updated in the dashboard.
There is a million things you could build with ViewerKit to enhance your workflow, whether you are a developer or a designer, a product manager or anyone who wants to leverage an AI agent for your own workflow.
Start with these questions:1.What workflow do I want to use Cursor agent for? (The ones beyond coding)2.What files are being used in this workflow? (The ones that can be edited by LLMs directly or edited by code)3.How do I want to view these files and how do I want to edit/interact with them? (the viewer, the editor or the attached functions on handling these files)
Vibe code the extension
Start with the built in template [packages/templates/simple-react-extension], and write up your prompt to guide Cursor to build your extension based on the template.
You should consider using our template prompt below, as it has been written to cover most necessary details on building the extension, and all you need to do is to update the placeholders with your own requirements.
The prompt template document
https://github.com/dabochen/viewerkit/blob/main/packages/templates/extension-prd-template.md
Your actual prompt can be very simple, and you can @ this file in the agent chat window, and ask the agent to follow instructions from this file to implement it.
The prompt template and the extension template are being design to let you create the fully working template in ONE prompt, unless it is a very complicated requirement, it should work just fine, if you do have a more complicated idea, try to limit the first version to a MVP, so that you can at least get something running to make sure that you are on the right track before adding more to it.
Testing and deployment
For testing, after the extension code is compiled and built, make sure you prompt the agent to add your new extension to the launch.json file in the /.vscode folder (which should contain the template’s entry point), you either replace it or add your new extension to it.
This will add a new extension to this list below, and you can select yours before click on the play button. Then the rest of the testing will be the same as the template extension we talked about earlier.
To deploy it, you can package the project into a .vsix file and install it in any VS Code IDE, just ask Cursor to help you package it for you. Then go to your target VS Code IDE and follow these steps:
# Open the command panel in Cursor or VS Code
cmd + shift + P
# Type this command in the input box, press enter and select the .vsix file from your folder
Extension: Install from VSIX...
Then you are all set, you should see it work as you designed, and it should be listed in the extensions panel like the screenshot below.
More thoughts
As I build the ViewerKit Toolkit and the extensions (expect more extensions!), I started to feel that there could be a real shift in software production and distribution.
People criticise on how vibe coded software by non-developers are just demos, and I agree with that as production level software is a complicated system even for a small project and the code is only part of it. However, I do want to challenge this idea, maybe the traditional way of building software is just out dated.
Personal computing is not really personal, the device is personal, but the software is an abstraction from similar needs. How do you make software personal beyond an abstraction?
Based on ViewerKit, the answer would be “A toolkit” + “A prompt”.
The toolkit is the house you live in, and the prompt is the furniture.
We don’t ship and distribute fully made softwares, we ship ones that have a solid foundation and can be prompted to add the customised layer.
Join me on my X (x.com/chendabo), and @ me with your new invention!
Build any AI workspace you can imagine—data analytics, slide decks, writing tools, personal notes, even prompt playgrounds—right inside Cursor with a one-click makeover.
Cursor, Windsurf, or VS Code doesn’t have to stay a code editor; each can become a multi-purpose AI-agent hub with custom interfaces tuned to your workflow.
Powered by our open-source toolkit, you can vibe code your own agent in minutes—or install an off-the-shelf extension and start vibe creating, zero code required.
You will be guided through the setup of ViewerKit in this documentation.
Star our toolkit on Github
↗
Before we get started
Glad that you’ve made it here, I’m Dabo and I will walk you through the setup of either the extension or the open source toolkit.
Viewerkit Toolkit is inspired by how people hack Cursor to do things beyond coding. I was never a fan of the IDE interface until I realised that I can customise it to fully embrace the AI agent workflow on almost anything.
What you will get:
1.A few ready to use extensions that work out of the box to get you started.
2.An open source toolkit that you can use to build your own AI agent tool on top of Cursor.
When I talk about Cursor in this document, I’m basically referring to all VS code based IDEs.
Installing ViewerKit extensions
Follow these steps to install and use the above extensions.
This is all you need to know if you are only interested in the extensions. Continue reading if you want to know how to build your own extension.
Getting started with ViewerKit Toolkit
I’ve made a few extensions for my own use cases and found myself building the same foundation of these extensions.
The file handling with auto save and hot reload with conflict resolving, compatibility with different versions of VS Code and the basic framework for the web view of any content etc.
Then I rebuild the core of these extensions into this Viewerkit Toolkit project. I have optimised it for Vibe coding, so after you git clone it, you can easily ask Cursor to read the codebase and the documentations to start building your own extensions on top of it.
The template inside the project is basically a bare minimum version of an extension that can run and load any specified file and render it in a web view panel. It already handles the file I/O tasks, and all you need to do is to prompt Cursor to build on top of it with your own requirements.
git clone https://github.com/dabochen/viewerkit.git
So, just git clone the project, and you are 90% there.
Running the template
The template is a fully working extension that loads markdown files raw content and renders it in a text editor, so that you can try the auto save when editing, and it will update the content when external changes are made to the file.
I suggest you to run it once before getting into the development of your own extension if it is the first time that you build a VS Code extension.
# Go to the folder and install dependencies as they don’t come with the source code
cd packages/templates/simple-react-extension
npm install
# Build webview React APP
cd webview-ui && npm run build
# Go back up one level and compile the extension
cd .. && npm run compile
With the above steps, your extension is ready in the development environment and can be tried out inside the IDE. To test it, follow the next steps:
1
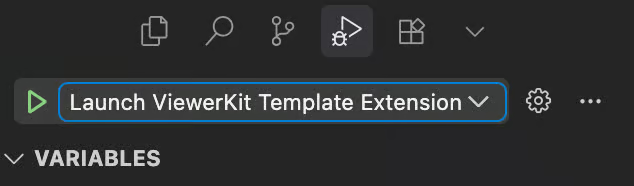
Launch the extension in the VS Code’s debug host window
Click the ‘Play’ button at the top left corner of your IDE. It usually is the 4th button. This opens the debug panel, and at the top, you should see “Launch ViewerKit Template Extension”, if not, click the drop down and select this option.
Then click the green play button, and a new window will be launched, open a new folder as a project, and create any markdown files to test with.
2
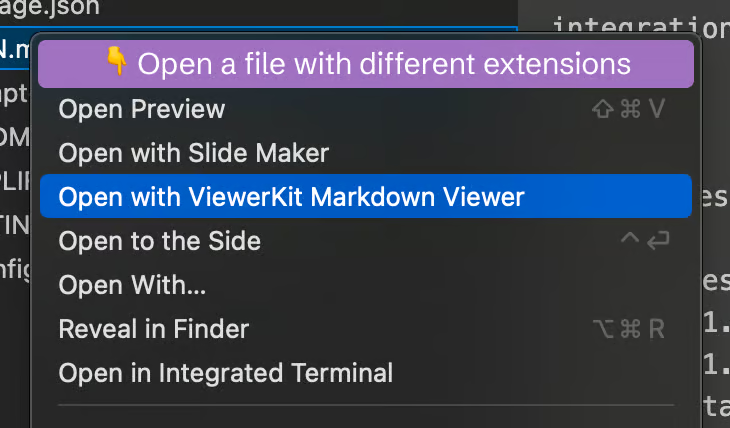
Open files with extension’s custom view
In the new window, right click on any markdown file from the left panel, then you will see a list of options starting with “Open with ...”, if the file is open after you click on the highlighted option, it means it is running properly.
Building your first extension with ViewerKit Toolkit
Let’s talk about limitations before we get into the details.
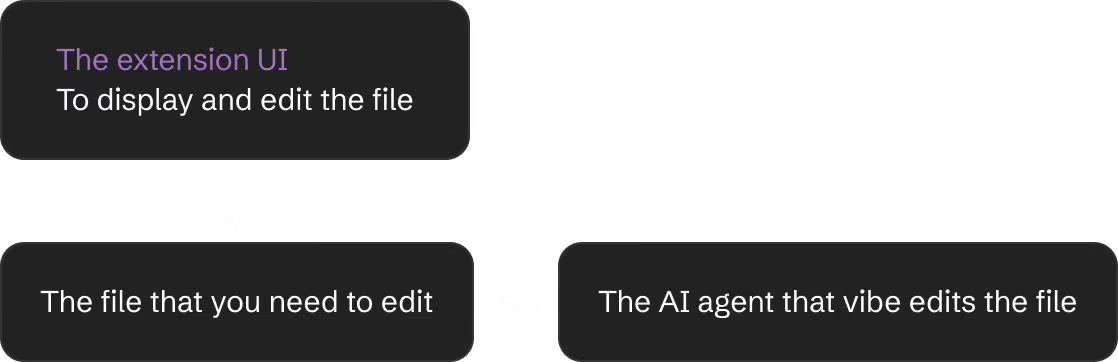
ViewerKit’s core idea is to add an interface layer to any type of files inside Cursor, so that when you vibe edit them through the agent, you get a much better and more friendly interface to interact with the files, to view and edit manually.
The three extensions that are launched with the toolkit are all built with this idea.
The whole idea is to leverage Cursor to be the universal purposed agent which handles the online search, the local file retrieval and the file editing. All we are bringing to the table is the UI layer that turns your targeted file format into a desired interface beyond a text editor.
This means that the extension is NOT going to change how the Cursor agent works or its chat window, it is only there to replace the default code editor panel with a customised view along with any custom logics running in the background.
Best practices
Based on the understanding of the limitations, you can design your app in this simple format:
A file format + How I want it to be shown + How I want it to be interacted with
You could design a viewer for a specific json format that is being used in your workflow, so that you can view and edit it in a customised view, and use Cursor to edit it with the agent.
You could also design an editable viewer for config files, so that both Cursor and you(your team) can manage it.
Beyond the simple one file + one viewer format, you could also design more complexity into it, and load multiple files into one view, just like the I18n Manager extension on our website, which takes in multiple translation jsons and renders them in one table (If you do this, make sure you tell Cursor to be aware of this difference from the default template).
If you want something that can be integrated to your software project, you could design a unit test dashboard that manages all the tests and let Cursor agent create them and run it while you see the results gets updated in the dashboard.
There is a million things you could build with ViewerKit to enhance your workflow, whether you are a developer or a designer, a product manager or anyone who wants to leverage an AI agent for your own workflow.
Start with these questions:1.What workflow do I want to use Cursor agent for? (The ones beyond coding)2.What files are being used in this workflow? (The ones that can be edited by LLMs directly or edited by code)3.How do I want to view these files and how do I want to edit/interact with them? (the viewer, the editor or the attached functions on handling these files)
Vibe code the extension
Start with the built in template [packages/templates/simple-react-extension], and write up your prompt to guide Cursor to build your extension based on the template.
You should consider using our template prompt below, as it has been written to cover most necessary details on building the extension, and all you need to do is to update the placeholders with your own requirements.
The prompt template document
Your actual prompt can be very simple, and you can @ this file in the agent chat window, and ask the agent to follow instructions from this file to implement it.
The prompt template and the extension template are being design to let you create the fully working template in ONE prompt, unless it is a very complicated requirement, it should work just fine, if you do have a more complicated idea, try to limit the first version to a MVP, so that you can at least get something running to make sure that you are on the right track before adding more to it.
Testing and deployment
For testing, after the extension code is compiled and built, make sure you prompt the agent to add your new extension to the launch.json file in the /.vscode folder (which should contain the template’s entry point), you either replace it or add your new extension to it.
This will add a new extension to this list below, and you can select yours before click on the play button. Then the rest of the testing will be the same as the template extension we talked about earlier.
To deploy it, you can package the project into a .vsix file and install it in any VS Code IDE, just ask Cursor to help you package it for you. Then go to your target VS Code IDE and follow these steps:
# Open the command panel in Cursor or VS Code
cmd + shift + P
# Type this command in the input box, press enter and select the .vsix file from your folder
Extension: Install from VSIX...
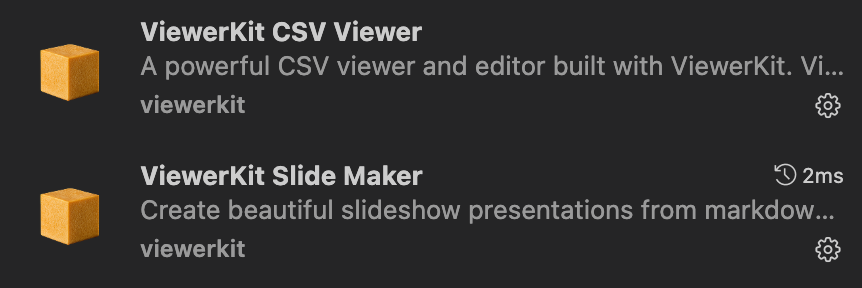
Then you are all set, you should see it work as you designed, and it should be listed in the extensions panel like the screenshot below.
More thoughts
As I build the ViewerKit Toolkit and the extensions (expect more extensions!), I started to feel that there could be a real shift in software production and distribution.
People criticise on how vibe coded software by non-developers are just demos, and I agree with that as production level software is a complicated system even for a small project and the code is only part of it. However, I do want to challenge this idea, maybe the traditional way of building software is just out dated.
Personal computing is not really personal, the device is personal, but the software is an abstraction from similar needs. How do you make software personal beyond an abstraction?
Based on ViewerKit, the answer would be “A toolkit” + “A prompt”.
The toolkit is the house you live in, and the prompt is the furniture.
We don’t ship and distribute fully made softwares, we ship ones that have a solid foundation and can be prompted to add the customised layer.
Join me on my X (x.com/chendabo), and @ me with your new invention!